Are you finding a quick solution to get a screenshot from your Lenovo laptop using Windows 10? Getting a screenshot can be handy to capture your laptop screen’s snapshot. You can use it for various needs like preparing guides, storing crucial information, or sharing something interesting with a buddy. This tutorial will tell you how to capture a screenshot on a Lenovo laptop using Windows 10. You’ll also uncover some useful tips and tricks to enhance your screenshot experience.
Steps to Capture a Screenshot on Lenovo Laptop with Windows 10:
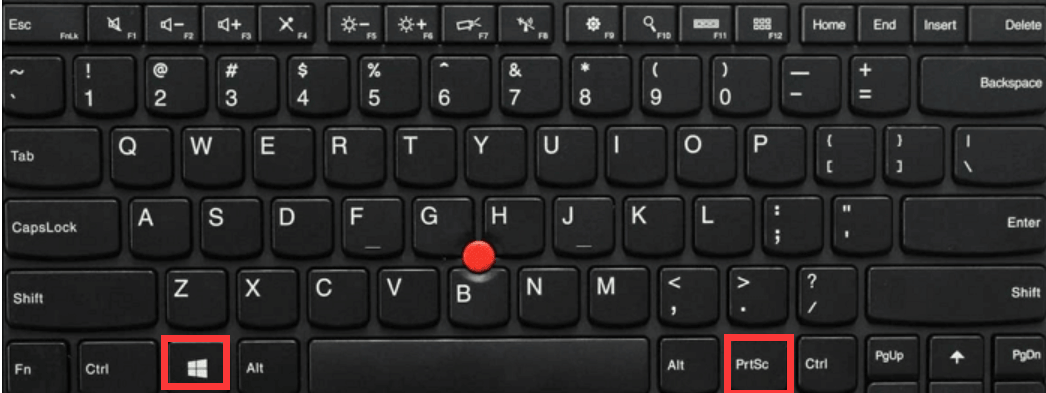
Press the Windows + PrntScrn keys simultaneously on your keyboard.
Open the Pictures folder and then the Screenshots Folder.
Look up your screenshot, labeled as “Screenshot (number)”.
Right-click on the screenshot, then click “Edit”.
Lastly, save the screenshot.
Capturing Screenshots on Lenovo Laptop with Windows 10
Taking screenshots on a PC is an effective way to grasp moments, distribute data, or record a specific issue. It’s pretty easy on a laptop using Windows 10 and this tutorial will guide you through the process.
Firstly, to capture a screenshot on your Lenovo laptop with Windows 10, press the PrtScn, or Print Screen, key. It’s typically found on the top right section of the keyboard, but its location may differ on various models. As you press the Print Screen key, the screenshot gets stored in the clipboard, which you can then paste into an image editing software.
Secondly, you can use the Windows Snipping Tool. Just type “Snipping Tool” in the Windows search bar. It lets users capture a specific part of the screen or the whole screen. Also, you can make any notes on the screenshot before saving.
Using the PrtScn Key
After pressing the Print Screen key, the screenshot automatically gets stored in the clipboard. This screenshot can be pasted into any image-editing software like Microsoft Paint or Photoshop. Just open the software and press Ctrl+V.
You can also save the screenshot directly to your computer by first pasting it into an image-editing tool. Open the software and press Ctrl+S. From there, you can choose the format for saving your screenshot like PNG, JPEG, or GIF.
Pasting the Screenshot into an Image-Editing Software
Pasting the screenshot into an image-editing tool is an easy process. Open the image-editing software and press Ctrl+V. This will paste the screenshot into the software, allowing you to edit the screenshot or save it to your computer.
Saving the Screenshot
Once you’ve pasted the screenshot into an image-editing tool, you can save it to your machine. Open the software and press Ctrl+S. From there, you can decide on the format for saving your screenshot like PNG, JPEG, or GIF.
Using the Windows Snipping Tool
The Windows Snipping Tool is a handy tool for capturing screenshots on a Lenovo laptop using Windows 10. Type “Snipping Tool” in the Windows search bar to access it. Once you open the tool, you can decide to capture a particular part of the screen or the entire screen.
Capturing a Screenshot with the Windows Snipping Tool
It’s simple to take a screenshot with the Windows Snipping Tool. Firstly, open the tool by typing “Snipping Tool” in the Windows search bar. Once opened, you can choose to capture a specific part of the screen or the entire screen. Then you can make any notes on the screenshot before saving it.
Saving the Screenshot
After capturing the screenshot with the Windows Snipping Tool, you can save it to your computer. Click on the “Save” button at the top of the window. From there, you can choose the format for saving your screenshot like PNG, JPEG, or GIF.
Some commonly asked questions:
Q1: How do I screenshot the whole screen on a Lenovo laptop with Windows 10?
A1: You can do so in two ways: use the Print Screen (PrtSc) key, or use the Windows Key + PrtSc key combination. Both will save the screenshot into the Pictures > Screenshots folder.
Q2: How do I screenshot a specific area on a Lenovo laptop with Windows 10?
A2: Using the Windows Key + Shift + S key combination, you’ll activate the Snipping Tool which lets you screenshot any area of the screen. Once you’ve selected the area, you can save the screenshot as an image file.
Q3: How can I take a screenshot without saving it on a Lenovo laptop with Windows 10?
A3: The Alt + PrtSc key combination will take a screenshot of the active window and save it to the clipboard. You can then paste the screenshot wherever you want, like a Word document or an image editor.
Q4: How to take a screenshot with a time delay on a Lenovo laptop with Windows 10?
A4: Use the Snipping Tool for this. Press the Windows Key + Shift + S key combination to activate it. Once opened, click the down arrow next to the New button and select the Delay option. This lets you set a timer for the screenshot.
Q5: How to take a screenshot of a webpage on a Lenovo laptop with Windows 10?
A5: Use the Windows Key + Shift + S key combination to activate the Snipping Tool. This lets you screenshot any webpage. Once you’ve selected the webpage area, you can save the screenshot as an image file.
Q6: How do I take a screenshot of the active window on a Lenovo laptop with Windows 10?
A6: The Alt + PrtSc key combination will screenshot the active window and save it to the clipboard. You can then paste the screenshot wherever you want, like a Word document or an image editor.
Capturing screenshots on a Lenovo laptop with Windows 10 is quite simple and can be done in a few steps. With the Windows + Prt Scr shortcut or the Snip & Sketch tool, you can grab a snapshot of your screen and save it to your computer. Whether you need an image for a project or just want to capture a moment, taking a screenshot on your Lenovo laptop is now a breeze.