Introduction: Unlocking the Power of Screenshots
In the fast-paced digital age we find ourselves navigating, capturing and sharing moments from our screens has become an integral part of our daily lives. Whether it’s preserving vital information, creating educational content, or simply sharing a hilarious meme, the ability to take screenshots is a fundamental skill. For Gateway laptop users, mastering the art of screenshotting is not only convenient but also opens up a world of possibilities for effective communication and documentation.
In this comprehensive guide, we will delve into the various methods available for taking screenshots on a Gateway laptop, exploring both built-in features and third-party applications. Regardless of whether you are a seasoned tech enthusiast or a casual user, by the end of this guide, you’ll be equipped with the knowledge to effortlessly capture and share the content on your Gateway laptop screen
Understanding Gateway Laptop Screen Capture Basics
When it comes to taking screenshots on your Gateway laptop, understanding the basics is crucial. Different operating systems may have slightly varied methods, so let’s delve into the specifics.
Windows Operating System
If your Gateway laptop runs on Windows, you have multiple options for taking screenshots. The most common methods include:
- Print Screen (PrtScn): Pressing the ‘PrtScn’ key captures the entire screen. You can paste it into an image editor like Paint or Word and save the file.
- Snipping Tool: Windows Snipping Tool allows you to capture specific parts of your screen. Open the tool, select the area you want to capture, and save the image.
- Snip & Sketch: This Windows app offers more advanced screenshot options, allowing you to annotate and edit your captures before saving.
Mac Operating System
For Gateway laptops running on macOS, the process is slightly different:
- Command + Shift + 3: Captures the entire screen and saves it on your desktop.
- Command + Shift + 4: Enables you to select a specific area for capture.
- Command + Shift + 4, then Spacebar: Captures a specific window when you click on it.
Advanced Techniques for Gateway Laptop Screenshots
Now that you’ve mastered the basics, let’s explore some advanced techniques to enhance your screenshot game.
Using Snagit for Professional Screenshots
Investing in third-party tools like Snagit can elevate your screenshot experience. Snagit offers features such as scrolling capture, annotation, and even GIF creation, providing a versatile solution for various screenshot needs.
Capturing Dropdown Menus and Pop-ups
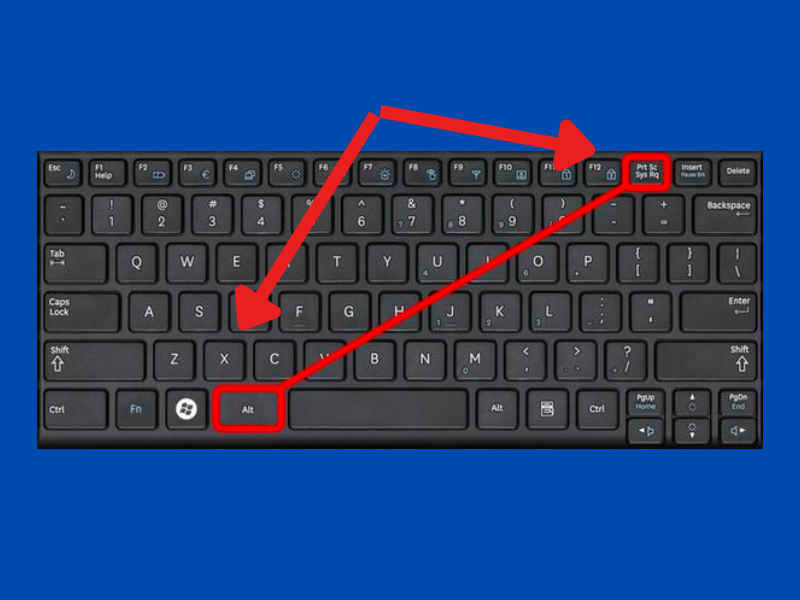
Standard screenshot methods might miss dropdown menus or pop-ups. To capture these, consider using the ‘Print Screen’ key in combination with the ‘Alt’ key. This ensures you grab everything on your screen, even those hidden elements.
Troubleshooting Common Issues
Even with the best tools and techniques, you might encounter issues while trying to screenshot on your Gateway laptop. Let’s address some common problems and solutions.
Blank Screenshots
If your screenshots turn out blank, it could be due to compatibility issues with certain applications. Try using alternative methods like Snipping Tool or Snip & Sketch.
File Saving Errors
If you’re unable to save your screenshots, check your storage space. Sometimes, insufficient disk space can hinder the saving process. Clear some space and try again.
Frequently Asked Questions (FAQs)
Q1: Can I take a screenshot of a specific application window?
Yes, on Windows, press ‘Alt + PrtScn’ to capture only the active window. On Mac, use ‘Command + Shift + 4, then Spacebar.’
Q2: Why is my Snipping Tool not working?
Ensure it’s enabled in Windows Features. Go to ‘Control Panel > Programs > Turn Windows features on or off,’ and check ‘Tablet PC Optional Components.’
Q3: Is there a shortcut for capturing the entire webpage?
Yes, tools like Snagit offer scrolling capture functionality, allowing you to capture an entire webpage.
Q4: Can I customize the screenshot save location?
Absolutely. Most screenshot tools, including Snagit, allow you to choose your preferred save location.
Q5: Are there any browser extensions for quick screenshots?
Yes, extensions like Lightshot and Nimbus Screenshot can streamline the screenshot process directly from your browser.
Conclusion: Mastering the Art of Screenshots
In conclusion, the process of capturing screenshots on your Gateway laptop is not merely a technicality but a skill that enhances your overall computing experience. This comprehensive guide has walked you through the fundamental methods of screenshotting, from the basic keyboard shortcuts to the advanced features available through third-party applications.
By understanding the nuances of full screen captures and selective region captures, you’ve gained the ability to tailor your screenshotting approach to specific needs.
The built-in options provided by Gateway laptops offer a user-friendly entry point for individuals of all technical backgrounds. These features, coupled with the step-by-step instructions detailed in this guide, enable you to effortlessly integrate screenshotting into your daily computing routine.
Whether you’re capturing important information, creating educational content, or simply preserving moments, the native tools on your Gateway laptop provide a solid foundation for this essential skill.
For those seeking to elevate their screenshotting experience, we explored advanced options, including third-party applications that bring additional functionalities and customization to the table.
The diverse range of tools available caters to different preferences and user requirements, allowing you to choose the solution that best aligns with your needs. From feature-rich screenshot utilities to cloud-based storage solutions, the possibilities are expansive.
However, as with any technical skill, challenges may arise. This guide has addressed common troubleshooting issues, ensuring that you have the knowledge to overcome obstacles and make the most out of your Gateway laptop’s capabilities.
Additionally, the provided tips and tricks aim to optimize your screenshotting workflow, empowering you to efficiently and effectively capture and share content.
In the grand tapestry of digital communication, the ability to take screenshots is a thread that weaves seamlessly into our daily lives. Whether you’re a student, a professional, or someone who simply enjoys the convenience of technology, mastering the art of screenshotting on your Gateway laptop is a valuable asset.
As you embark on this journey, armed with the insights gained from this guide, may your screenshotting endeavors be smooth, precise, and tailored to meet your unique needs in the ever-evolving landscape of digital interactions.